Introduction
The Boeing jet in Figure 1 has winglets at the tips of its wings. Why are they there? What do they do?

Figure 1. A Boeing 757 jet with winglets at the tips of the wings.
As an airplane moves through the air, the wings generate lift by creating an area of low pressure above the upper surface of the wing. The higher air pressure beneath the lower surface of the wing lifts the plane. At the tip of the wing, the high and low pressure air meet.
The air forms miniature tornadoes, called wing tip vortices that spread out behind the plane (see Figure 2, below).

Figure 2. Wing tip vortices made visible behind a plane using colored smoke.
Wing tip vortices cause two problems:
- the turbulent airflow they create can be strong enough to flip an airplane that encounters it;
- they also increase the drag forces on the airplane that generates them, decreasing fuel efficiency.
While there is no way to completely eliminate the vortices, winglets help reduce their negative effects.
In this project, you will test paper airplanes built both with and without winglets and measure the effect on flight performance. When doing your background research, you should also study vertical stabilizers. In the simple designs used in this project, winglets will also function as vertical stabilizers.
Terms and Concepts
- Fuselage
- Airfoil
- Winglets
- Vertical stabilizer
- Horizontal stabilizer
- Drag
- Lift
- Center of lift
- Center of gravity
- Wing tip vortices
Questions
- What are the three forces acting on a glider in flight?
- What relationship between these forces is needed for stable flight?
- How will the addition of winglets affect these forces?
- How will the addition of winglets affect flight performance?
Bibliography
- You'll definitely want to check out the Gliders section (among others) of NASA's Beginner's Guide to Aeronautics. This site is packed with useful information on the science of flight:
NASA, 2005a. "Guided Tours of the Beginner's Guide to Aeronautics," NASA, Glenn Research Center [accessed June 8, 2006 ]http://www.grc.nasa.gov/WWW/K-12/airplane/guided.htm. - Here are two links with alternative designs for folded paper airplanes. The second link (Palmer, 2000) has an excellent plan (PL-1, "Joe's Favorite") for testing with and without winglets:
- NASA, 2005b. "Folding Paper Airplane: How To Build a JET Model," NASA Glenn Research Center [accessed June 8, 2006] http://www.grc.nasa.gov/WWW/K-12/WindTunnel/Activities/foldairplane.html.
- Palmer, J., 2000. "Joseph Palmer's Paper Airplanes," [accessed June 15, 2006] http://www.josephpalmer.com/planes/Airplane.shtml.
- Here are some sources of information on winglets:
- ScienceIQ.com, (n.d.). "Taming Twin Tornadoes," NASA Aerospace Technology Enterprise [accessed June 25th, 2013 ]http://www.scienceiq.com/Facts/TwinTornadoes.cfm.
- Larson, G.C., 2001. "How Things Work: Winglets," originally published in Air & Space/Smithsonian, Aug/Sep 2001, available online:http://www.airandspacemagazine.com/ASM/Mag/Index/2001/AS/htww.html.
Materials and Equipment
- Paper for making airplanes
- Tape measure to measure flight distance
- An indoor location with open space to test-fly the planes
- Optional: stop watch to measure flight time
Experimental Procedure
- Do your background research so that you are knowledgeable about the terms, concepts, and questions above.
- Start with your favorite paper airplane design. Figure 3, below, shows one popular model (see the first suggestion in the Variations section, below, for ideas on optimizing the design). This NASA link has another design you can try: http://www.grc.nasa.gov/WWW/K-12/WindTunnel/Activities/foldairplane.html.
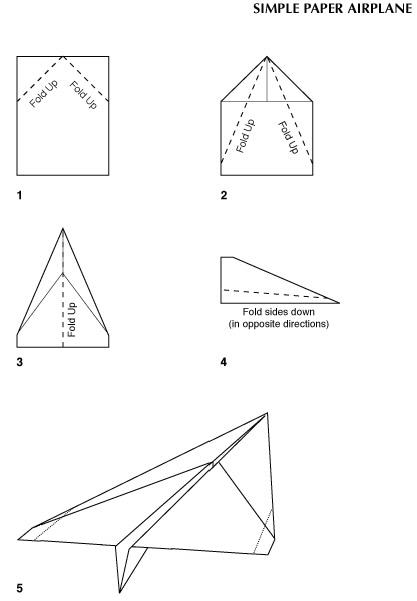 Figure 3. The simple, classic folded paper airplane.
 - Using your chosen design, build several identical paper planes.
- Test-fly each plane at least 5 times, and measure the distance flown. Be careful to launch the planes at the same angle, and with the same amount of force each time. Note any instabilities in the flight characteristics (nose dives, rolling, turning). Optional: you can also use a stop watch to measure the flight duration. Keep track of the data in your lab notebook.
- Fold a small portion of each wing tip up to create equal-sized winglets on each wing, and repeat the test flights.
- Calculate the average flight distance for each plane, both with and without winglets.
- Did flight distance improve with winglets? Were there improvements in other flight characteristics?
No comments:
Post a Comment