Introduction
A hovercraft is a type of vehicle that rides on air that is under pressure. A flexible curtain, called a skirt, is attached to the outer perimeter of the craft to contain the air beneath it. The diagram in Figure 1 shows some of the key parts of a commercial hovercraft. The propellers force air toward the back of the craft, creating a forward thrust. The fans direct the air that is under pressure into the chamber beneath the craft. This air cushion lifts the hovercraft up, creating a small gap between the craft and the ground, for air to escape.
 Figure 1. These are the key parts of a hovercraft. (Wikipedia, 2007.)
 Figure 2. Rachel and Sara: "Who doesn't love to rise above it all? We're into engineering, so we built our own hovercraft. But it didn't work very well on grass. Our question: How can we optimize our design to create the best air film?" Click here to watch a video of this investigation, produced by DragonflyTV and presented by pbskidsgo.org. (TPT, DragonflyTV, 2007.)
Check out the short Dragonfly video on the right to see an example of how two students, Rachel and Sara, designed and built a working hovercraft. Then read on to see how you can build one, too.
Rachel and Sara found that different types of skirts, one tight and one baggy, affected how the hovercraft worked. To determine how the air was flowing out from beneath the hovercraft, they placed glitter under the hovercraft. Then they tested the two types of skirts for speed and for maneuverability in obstacle courses.
The goals of this project are 1) to build a hovercraft on which you can glide over a flat surface, and 2) to test what features affect the performance of the hovercraft. There are a number of variables that you will need to consider:
- Air pressure - The amount of weight that the hovercraft will be able to carry will depend on the amount of air pressure produced by the leaf blower. The hovercraft in the video used a gas-powered leaf blower. You could also try an electric leaf blower.
- Surface - The type of surface that the hovercraft is over will also affect performance. Smooth, flat surfaces allow the formation of an air cushion under the craft. Irregular surfaces may pose a problem since the air in the air cushion can escape, lowering the pressure under the craft.
- Hovercraft design - Consider ways to improve the performance of the hovercraft. For example, is there a better pattern for the vent holes? How does the amount of material in the skirt affect the height of the hovercraft above the ground?
- Materials - Test different materials for the skirt to see which give you the best results.
Terms and Concepts
Before you build your hovercraft, make sure you know what the following terms mean. Have an adult help you search the Internet or take you to your local library to find out more.
- Hovercraft
- Air cushion
- Air pressure
- Friction
Questions
- How does a hovercraft work?
- What factors did you have to control to make your hovercraft work?
- Will friction have an effect on your hovercraft? If so, what?
Bibliography
- This science project is based on this DragonflyTV podcast:
TPT. (2007). Hovercraft by Rachel and Sara. DragonflyTV, Twin Cities Public Television. Retrieved March 25, 2008 from http://pbskids.org/dragonflytv/show/hovercraft.html - This site has a set of plans for a hovercraft that is similar to the one described in this science fair project, but that uses two pieces of plywood.
Arlander, D. (n.d.). The Human Hockey Puck. John Adams Science Department. Retrieved March 27, 2008 from http://groups.physics.umn.edu/pforce/hovercraft.html - This site has information about the history of hovercraft design:
Wikipedia contributors. (2008, March 25). Hovercraft. Wikipedia: The Free Encyclopedia. Retrieved March 27, 2008 from http://en.wikipedia.org/w/index.php?title=Hovercraft&oldid=200786231
Materials and Equipment
Here are the materials you will need to make the hovercraft.
- Plywood, 3/8 or 1/2-inch thick. There are several options for the plywood base. The easiest is probably to buy a pre-cut 48-inch-diameter round tabletop. Alternatively, you can buy a square piece of plywood and cut the corners off to make a 48-inch-diameter circular base.
- Electric jig or spiral saw
- Electric sander (as an option to smooth the plywood edges)
- Duct tape
- Leaf blower, electric or gas-powered
- Pencil (for tracing)
- Safety goggles
- Drill and a drill bit that will create a hole large enough to insert your jig saw or spiral saw into
- Measuring tape or ruler
- Plastic sheet, 4-mil or 6-mil thickness (6 mil = 0.006 inches); it should be 1 foot larger than the plywood base on all edges. A 6x6-foot square, or a 6-foot-diameter circle, should work well. Examples of a plastic sheet include:
- Visqueen (type of heavy plastic)
- Plastic drop cloth (from a paint or hardware store)
- Plastic shower curtain
- Plastic tablecloth
- Avoid plastic garbage bags, since they are too thin.
- Razor knife
- Scissors
- Staple gun
- Screwdriver
- Wood screws, small, 1/4-inch (4)
- Plastic disk, small, 6 inches in diameter. Suggestions are a coffee can lid, a plastic circle cut from a Frisbee®, or similar tough plastic item.
- Carriage bolt and nut, 1-inch, with washers (this is optional, to more securely attach the plastic disk to the plastic sheet)
- Permanent marker
- Lab notebook
Experimental Procedure
- To start this project, you should assemble all of the materials in a suitable work space, like your garage or workshop.
- Make the wood disk.
- If you did not obtain a pre-cut 48-inch round disk, make the base by cutting a 48-inch circle from your piece of plywood with a jig saw or spiral saw. Be sure to wear your safety goggles.
- If your disk does not have smooth edges, be sure to use an electric sander or duct tape to smooth out the edges or they will cut the skirt you'll be attaching to it.
- Make a hole in the plywood that fits the end of your leaf blower, as shown in Figure 3.
- Trace the outline for the hole with your pencil, using the leaf blower outlet as a guide. Position the hole halfway between the center of the disk and the edge.
- Drill a small hole on the perimeter of the traced circle with a drill bit, and then cut out the hole using the jig saw or the spiral saw.
- The end of the hose should be flush with the bottom surface of the plywood.
 Figure 3. Shown here are the hovercraft components: leaf blower, wood base, plastic sheet, plastic disk, small wood screws.
 - Attach the plastic skirt.
- Use scissors to cut the plastic into a circle with a diameter of about 6 feet.
- Place the plywood disk over the plastic sheet.
- Fold the edges of the plastic sheet up over the plywood, and then staple it to the top of the plywood disk.
- Leave enough slack for the skirt to inflate!
- Space the staples out so that there is one about every 4 inches.
- Though the staples are holding the plastic in place, you need to create a tight seal around the edge of the plastic with duct tape.
- Attach the disk.
- Flip the plywood over so that the plastic sheet is facing up.
- The plastic disk should be attached over the plastic sheet.
- Attach the plastic disk to the center of the plastic sheet and the plywood of the hovercraft by using the four small wood screws.
- If the disk is not secure enough with the wood screws, drill a hole through the plastic disk and the plywood base and attach the disk with a 1-inch carriage bolt and nut, with washers on both sides.
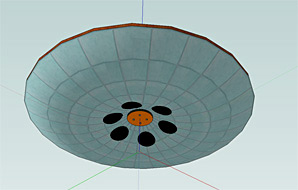 Figure 4. This image shows the bottom of the assembled hovercraft, with the skirt inflated. The plastic disk is attached to the middle of the base, over the skirt. Note the position of the six air vent holes.
 - Cut the air vent holes, as shown in Figure 4.
- Use a permanent marker and a ruler to draw six circles around the plastic disk. Each hole should be about 2 inches in diameter. Then use your razor knife to cut six vent holes in the plastic.
- Position the holes within a few inches of the plastic disk. If they are too far from the center, they may be blocked by the ground, preventing air from escaping.
- To prevent the material between the vent holes from ripping, you can use duct tape to reinforce the holes.
- Flip the hovercraft over so the plastic sheet is now on the bottom.
- Place the leaf blower into the hole that was cut for it on the top of the hovercraft and turn it on. You may need to lift the plywood off the ground slightly to let the air flow into the plastic skirt.
- Seal the hole around the blower with duct tape if too much air is escaping.
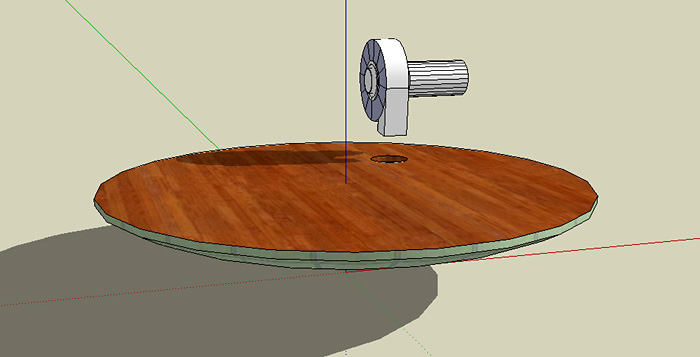 Figure 5. The top of the hovercraft, with the blower.
 - To test the hovercraft, place it on a smooth, flat surface, in an area with surrounding walls or fencing.
- The hovercraft will lift up and start gliding around.
- Have an adult help you as you maneuver the hovercraft. Carefully sit on the hovercraft. When you are safely on, turn the leaf blower on.
- Test out your hovercraft's speed and maneuverability.
- Keep careful notes of your assembly procedures, any modifications you add, and the performance of the hovercraft. Remember, if you don't write it down, it's like you didn't do it!
- To stop in an emergency, pull the blower hose out of the hole.
Important Hovercraft Safety Guidelines:
- Use caution when working with power tools.
- Use caution when using the razor knife.
- Don't let small children play alone with the hovercraft.
- Operate the hovercraft in an enclosed area, such as a classroom or fenced-in area outside, so that it does not get out of control.
- Climb aboard BEFORE turning on the leaf blower.
- If using an electric leaf blower, be careful maneuvering around and pay attention to the length of the cord.
- Wear closed-toe shoes to prevent injuries to your feet.
- Wear ear protection if you are operating the leaf blower for long periods of time.
- Wear eye protection to avoid dust or other small particles that might get blown into your eyes by the forced air.
- Don't jump off of the hovercraft while it's moving.
- If using an electric leaf blower, have an adult remain near the wall outlet. If the hovercraft moves too fast, have the adult pull the power plug out of the wall to stop the hovercraft. Do this only in emergencies, since the passenger might fly off when the hovercraft suddenly stops.
- Do not operate the hovercraft over water or on rough surfaces.
No comments:
Post a Comment