Introduction
Humpback Whales are close cousins of the Blue Whale, the largest known animal on earth! They are a member of the baleen whales, and are famous for their "singing" ability. Another talent of the Humpback Whale is that it hunts for food by circling beneath a school of fish and creating a "bubble net" from below. The "bubble net" will surround the schooling fish so that the whale can swim up from below, mouth open wide to eat them all. To make the bubble net, the huge animal must turn a very fast, tight circle while swimming in the water. How does such a large animal maneuver so well through the water?
Humpback Whales have a very stiff body, similar to a large submarine. To help overcome this problem they have very long flippers on either side of their body that they use to maneuver. The front sides of the flippers have an irregular, scalloped edge that had puzzled scientists until they realized the secret. The bumps of a Humpback whale's fins are called tubercles, which help them move gracefully through the water without meeting too much resistance, drag, or friction.
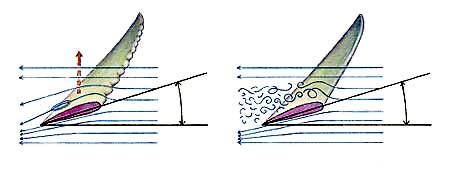
The fins of a Humpback Whale help them move through the water without generating too much drag, allowing the whale to maneuver gracefully through the water (AMNH, 2004).
Interestingly, other animals which swim the oceans have adaptations that help them avoid friction, too. Sharks have tiny scales, called denticles, on their skin which help reduce friction when swimming. Mackerel have sharp, tiny fins on the trunk of their tail which help reduce friction when moving their tail during swimming. Examples of friction-reduced surfaces can also be found in the sports that we play. A golf ball has many dimples covering the surface that help reduce drag, enabling the golfer to hit the ball farther. The one thing that all of these have in common is a textured surface structure.
Biomimetics is when a man-made object is engineered by modeling a natural object in the hope that the function of the man-made object will improve. In this experiment you will test different textured surfaces like those found on Humpback whales and Shark skins to see if they can improve the design of a simple wing. You will use a very simple flying object made of paper, called a whirlybird. Which design will reign supreme, the whirly-bird or the whale-y-bird?
Terms and Concepts
To do this type of experiment you should know what the following terms mean. Have an adult help you search the internet, or take you to your local library to find out more!
- hydrodynamics
- biomimetics
- lift
- friction
- drag
- surface structure
- whale fin tubercles
- shark skin riblets
- mackerel finlets
- golf-ball dimples
Questions
- How do tubercles work?
- How is lift generated and drag reduced?
- Will using biomimetics improve the design of a paper whirly-bird?
Bibliography
- Read here about how the humpback whale uses tubercles to turn:
Summers, A., 2004. "As the Whale Turns," American Museum of Natural History. [Accessed October 6, 2006 http://biomechanics.bio.uci.edu/_html/nh_biomech/whaleturn/whaleturn.htm - This project was adapted from the NASA Explores program:
NASA, Date Unknown. "Rotor Motor," Washington, D.C.: National Aeronautics and Space Administration. [Accessed October 6, 2006] http://www.nasaexplores.com/show_k4_teacher_st.php?id=030106104821 - This article will explain the science of biomimetics, copying nature to make better machines:
Lock, C., 2004. "Ocean envy," Science News Online. Accessed October 10, 2006] http://www.sciencenews.org/articles/20040904/bob9.asp - Find out how Speedo used biomimetics of shark skin to make a space-age swimming suit:
BBC, 2004. "Swimming Goes Space Age!" London: BBC Sport Academy. [Accessed October 10, 2006] http://news.bbc.co.uk/sportacademy/hi/sa/swimming/features/newsid_3520000/3520472.stm
Materials and Equipment
- scissors
- construction paper
- markers
- stop watch
- balcony or other high structure
Experimental Procedure
- First you will need to make three whirly-birds with differently shaped edges. One will have a straight edge like the wing of a plane. One will have sharp, pointy edges like the tail of a tuna or the skin of a shark. The last one will have curvy, scalloped edges that resemble the tubercles of a whale fin or the dimples of a golf ball. Use the picture below as a template to make the three different whirly-birds from a sheet of construction paper:
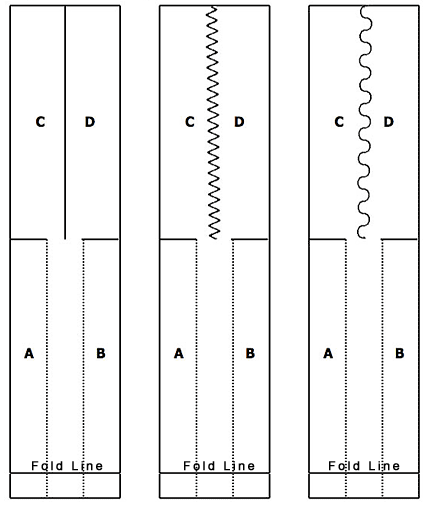
- Next, follow these instructions to fold the whirly-birds:
- Cut the whirly-birds on all of the solid lines in the template.
- Fold sections A and B toward each other along the dotted lines.
- Make a small fold at the bottom Fold Line to hold sections A and B together.
- Fold section C down on the solid line.
- Flip the whirly-bird over and fold section D down so that it is on the other side from section C.
- Your finished whirly-bird should look like this:
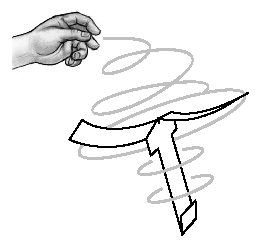
- Now you can conduct your experiment. Find a high place, like a balcony or playground structure, where you can drop your whirly-birds safely to the ground. Also, choose a day that is not windy, or else your whirly-birds will not drop reliably.
- Drop each whirly-bird from the structure and time the fall with a stop watch in seconds. You should do several trials of each whirly-bird design, testing each one at least 10 times. Then, calculate an average by adding up all of your trials and dividing your answer by 10. This will help to normalize your results so you can make a fair comparison. Keep track of your results in a data table like this:
Trial Number Time in Seconds (s) Straight Edges Pointy Edges Curvy Edges 12345678910Average - Make a bar graph of your data to compare the different wing designs. Make a time scale in seconds on the left side (y-axis) of the graph. Then draw a bar for each wing design up to the corresponding time. Be sure you remember to label the axes and the bars of your graph, and to give your graph a title.
- Analyze your data by asking yourself some questions. Which whirly-bird dropped the fastest? The slowest? What do you think this tells you about the level of air resistence of the design? How do you think this applies to water resistance?
No comments:
Post a Comment