Introduction
A jet airplane is a feat of engineering. It is amazing that such a big, clunky thing on the ground can be so elegant and efficient in the air. An airplane is meant to fly and not rattle along on the ground. The four forces that govern flight are drag, thrust, weight, and lift. Drag is an aerodynamic force that resists the forward motion of the airplane. Everything on an airplane, like the tail and rudders, interacts with the surrounding air during flight and contributes to drag. Thrust is the force that moves the airplane through the air. The engines on an airplane provide thrust to counteract drag. The third force is weight and is the action of gravity on the airplane. Finally, the fourth force is lift. Lift is the force that moves the airplane from the ground into the air. There are several factors that contribute to lift, including the size and shape of the airplane. The wings of the airplane provide for much of the lift. At takeoff, as the airplane speeds down the runway, the movement of air over and under the wings provides enough lift to overcome the force of weight and cause the plane to fly off the ground. Another factor that contributes to lift is thevelocity (forward speed) of the airplane. Increasing velocity means more air flowing over, under, and around an airplane's wings. Moving air creates air pressure, and further, slower air produces higher air pressure while faster air produces lower air pressure. Because of the shape of the wing, the air moving beneath the airplane wing is slower than the air moving over the wing, which results in a difference in pressure and thus lift.
When an airplane speeds down the runway, it eventually reaches the velocity when speed of the air over the wings is high enough that the forces of lift and thrust are greater than the forces of weight and drag, and the airplane takes off into the air. However, the key here is that the airplane has to accelerate down a runway of a certain length to get to the velocity needed to achieve the required lift to take off. What happens when the runway is not long enough? At major airports, runways can range between one to three miles long. Can an airplane take off safely on a short runway? The answer is yes, and you can see fighter jets taking off on short runways on naval aircraft carriers that would normally take longer runways to get airborne.
An aircraft carrier is a warship that acts as a seagoing airbase. During war or military exercises, the job of the aircraft carrier is to deploy and recover naval aircraft. But aircraft carrier runways are less than 1000 feet long—not the one to three miles that are required to get a plane up the in the air normally. How does a fighter jet on an aircraft carrier reach the velocity required to fly? Airplanes on aircraft carriers use a catapult to reach the velocity required for lift to overcome the force of weight. This is called catapult-assisted takeoff (CATO). Figure 1 shows a jet fighter flying off of the U.S.S. Intrepid.
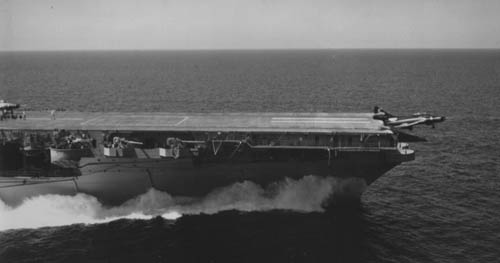 |
| Figure 1. This image is of the U.S.S. Intrepid, an aircraft carrier that used catapult-assisted takeoff to help jets take off. (Photo by: National Archives/U.S. Navy) |
What is a catapult and how does catapult-assisted takeoff work? A catapult is a device that is used to fling projectiles great distances. It is a compound machine made up of several simple machines. There are various types of catapults, but they all operate on the principle of stored energy. The projectile is flung when the stored energy is released. In aircraft carriers, the catapults are comprised of two pistons, each sitting in a cylinder which lie parallel and next to each other. The cylinders are embedded in the aircraft carrier's deck, and the pistons are attached to a shuttle, an apparatus that sits on the surface of the deck, which is then attached to the jet. When a jet is ready to take off, its front wheels are attached to a slot in the shuttle with a towbar and a holdback bar is attached to the back of the wheels and the shuttle. The pistons are locked into place, and cylinders are filled with steam to a preset pressure. The pilot turns on the jet's engines to develop thrust, and then, the pistons are released. The holdback bar falls away, and the jet is hurled forward. At the end of the runway the towbar pops off, and the jet is released. Watch the video below to see a catapult-assisted takeoff of a fighter jet.
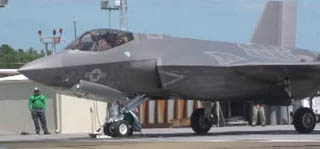 This video demonstrates a test of a catapult-assisted takeoff of an F-35C jet. The jet is specifically designed to take off and land on an aircraft carrier. (Video by All Hands Update/U.S. Navy) |
In this aerodynamics science project, you will investigate catapult-assisted takeoff using a model airplane. Can you confirm that a catapult, even in a much smaller model, will affect the flight? How does the catapult-assisted takeoff affect the accuracy of the flight?
Terms and Concepts
- Force
- Drag
- Thrust
- Weight
- Lift
- Aerodynamic
- Gravity
- Velocity
- Pressure
- Accelerate
- Catapult
- Catapult-assisted takeoff
- Simple machine
- Stored energy
Questions
- Who is Daniel Bernoulli and why is the Bernoulli Principle essential for flight?
- How many simple machines make up a catapult?
- Which type of catapult most closely resembles the catapult-assisted takeoff mechanism?
- Where does the steam that is used in catapulting a jet fighter off of the aircraft carrier come from?
Bibliography
- Benson, T. (2010, September 9). Four Forces on an Airplane. Retrieved October 3, 2011, from http://www.grc.nasa.gov/WWW/k-12/airplane/forces.html
- Harris, T. (2011). How Aircraft Carriers Work: Taking Off from an Aircraft Carrier. HowStuffWorks.com. Retrieved October 3, 2011, fromhttp://science.howstuffworks.com/aircraft-carrier3.htm
- The NASA SciFiles.com. (n.d.). What is Lift? Retrieved October 3, 2011, from http://scifiles.larc.nasa.gov/text/kids/Problem_Board/problems/flight/lift2.html
- Real-world-physics-problems.com. (2011). Catapult Physics. Retrieved October 3, 2011, from www.real-world-physics-problems.com/catapult-physics.htm
Materials and Equipment
- Triggered jet launcher toy like Gayla's Blue Angel jet launcher
. You can find jet launchers online at Amazon.com
- Wood stakes (4). You can find stakes in your local gardening store.
- Tape measure, 35 feet
- Target. This can be a chair with a pillow on the seat or whatever other setup you can build.
- Optional, video camera
- Lab notebook
- Graph paper
Experimental Procedure
Testing Catapult-Assisted Takeoff
- Find a large field that is free of trees and power lines to perform your tests.
- Read the instructions on the model jet's packaging to make sure that you understand how it operates.
- Remove the model jet from its packaging. Experiment with attaching the launching tube to the spring rod, catching the trigger hook to the holding ring, and launching the jet by releasing the trigger. Always grasp the front end of the jet when inserting it onto the spring rod. To avoid breaking the jet, never pull it by the tail section. In this project, the jet launcher is the catapult.
- Now start your testing. Push a wood stake in the ground. This is the starting line for your tests.
- Place your foot at the wood stake. Then, pull your hand back towards your shoulder as if you are going to punch something, and launch just the model plane. Do not use the launcher. Once the jet falls back to the ground, mark the location with a second wood stake. This condition mimics a jet flying with its engines alone.
- Measure the distance between the two wood stakes. Record the distance in your lab notebook under the "Fly without launcher" condition in a table like Table 1 shown below.
| Test Condition | Distance Trial 1 | Distance Trial 2 | Distance Trial 3 | Distance Trial 4 | Distance Trial 5 |
| Fly without launcher | |||||
| Fly with launcher | |||||
| Fly with launcher and throw |
- Now insert the jet onto the jet launcher, making sure that the trigger hook catches the holding ring. Place your foot at the first wood stake, point the jet launcher in the same direction that the jet flew in step 5, and squeeze the trigger. Once the jet falls back to the ground, mark the location with the third wood stake. Measure the distance between the first wood stake and the third wood stake. Record this value in your lab notebook under the "Fly with launcher" condition.
- Mimic a jet fighter with its engines on and attached to an aircraft carrier catapult. Insert the jet onto the jet launcher, making sure that the trigger hook catches the holding ring. In this condition you will release the trigger while throwing the jet and launcher. Place your foot at the first wood stake, point the jet launcher in the same direction as you flew the jet in step 5 and step 7. Then, pull your hand back towards your shoulder as if you are going to punch something. As you punch, release the trigger on the jet launcher. Practice doing this a few times so that you get the hang of it before starting your trials. Once you feel comfortable, start the testing and launch the jet with a punch. Once the jet falls back to the ground, mark the location with the fourth wood stake. Measure the distance between the first wood stake and the fourth wood stake. Record this value in your lab notebook under the "Fly with launcher and throw" condition.
- Perform four more trials of your tests, in order to ensure that your results are repeatable and accurate. Repeat step 5 through step 8 four more times. Record all of the data in your lab notebook.
Testing Accuracy of Catapult-Assisted Jets
- Now test to see how accurate catapult-assisted takeoff is; although, in real situations jets are not catapulted off of aircraft carriers toward a target. Put a wood stake in the ground, and set up the chair and pillow about 15 feet away from the first wood stake. If you are using a camera to help you determine if the target has been hit, set it up in this step so that the target is within its view.
- Place your foot at the wood stake and launch just the model plane. Do not use the launcher. Aim for the target. Record in your lab notebook in a table like Table 2 shown below whether the jet hit the target.
| Test Condition Distance= | Trial 1 | Trial 2 | Trial 3 | Trial 4 | Trial 5 | Trial 6 | Trial 7 | Trial 8 | Trial 9 | Trial 10 |
| Fly without launcher | ||||||||||
| Fly with launcher | ||||||||||
| Fly with launcher and throw |
- Insert the jet onto the jet launcher, making sure that the trigger hook catches the holding ring. Place your foot at the first wood stake, point the jet launcher towards the target, and release the trigger. Record in your lab notebook whether the jet hit the target.
- Insert the jet onto the jet launcher, making sure that the trigger hook catches the holding ring. In this condition you will release the trigger while throwing the jet and launcher. Place your foot at the first wood stake, and point the jet launcher towards the target. Then, pull your hand back towards your shoulder as if you are going to punch something. As you punch, release the trigger on the jet launcher. Record in your lab notebook whether the jet hit the target.
- In order to ensure that your results are reproducible and accurate, repeat steps 2 through 4 nine more times. Remember to always record your data in your lab notebook.
- Increase the distance between the stake and the target to 30 feet. Repeat steps 2 through 5 recording all the data in a table similar to Table 2.
Analyzing the Data
- Average the data in Table 1 for each condition over the three trials. Record the results in a table like Table 3 shown below.
| Test Conditions | Average Launch Distance |
| Fly without launcher | |
| Fly with launcher | |
| Fly with launcher and throw |
- Plot the data on a graph. If you would like to make your graphs online or want more information about graphing, visit the CreateAGraph website. Label the x-axis Test Condition and the y-axis Average Launch Distance.
- Calculate how accurate each test condition is in hitting the target. For each test condition and for each target distance (15 or 30 feet), count the number of times the target was hit and divide by the number of trials, or 10. Use Equation 1 to calculate the accuracy for each target distance, and record the data in your lab notebook.
- Can you see a difference among the three test conditions? Is one condition more accurate than the others?
Equation 1.
| Percent Accuracy = | (# of times target was hit) 10 | × 100 |
No comments:
Post a Comment