Introduction
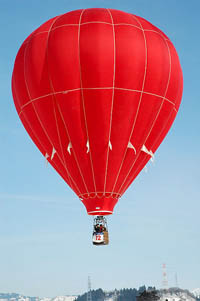
Figure 1. A hot-air balloon uses a fabric bag, called a lifting envelope, with an opening at the bottom, called the mouth. Attached to the envelope is a basket, or gondola, for carrying passengers. A burner is mounted below the mouth of the balloon, and injects a flame into the envelope, heating the air within.
Hot-air balloons are fun to watch. There is something magical about how they rise up into the sky and drift with the wind. But how does a hot-air balloon work?
Hot-air balloons are able to fly because air expands (grows larger so that it takes up more room) when it is heated. This is similar to the way popcorn kernels expand when you heat them. But instead of "popping open" like the popcorn kernels, some of the air in the hot-air balloon is pushed out of the opening in the bottom of the balloon as the air expands. In the end, there is less air inside of the balloon (because some has been pushed out), but it still takes up all of the space in the balloon because it has expanded (grown larger). This makes the air inside the balloon lighter than the surrounding air on the outside of it. The balloon has a buoyancy (a lifting force) equal to the weight of air that has been pushed out of the balloon as the air expands. The balloon is able to leave the ground when the weight of air that has been pushed out of the balloon equals the weight of the balloon itself, plus the expanded air inside of the balloon.
The buoyancy of the balloon is an example of Archimedes' principle. Archimedes was a mathematician and an inventor who lived in ancient Syracuse in Sicily, a region of Italy. His principle states that an object (in this science fair project, the balloon) immersed in a fluid (the surrounding air), is buoyed up by a force that is equal to the weight of the fluid that is replaced by the object. According to a tale, Archimedes discovered the principle (also called a law) that explained buoyancy while he was taking a bath. He observed that the more his body sank into the tub, the more water ran out over the tub. He is said to have been so pleased with his discovery that he leapt out of his bathtub and ran through the streets of Syracuse, naked, shouting "Eureka!"
In this science fair project, you will launch your own hot-air balloons made from dry-cleaning bags, using a toaster as a source of hot air. You will start with a full-length dress-sized dry-cleaning bag. To determine how the size of the balloon affects its flight, the size of the balloon will be decreased by trimming off some of the material at the bottom. The goal is to determine how the size affects the length of time that the balloon can fly.
Terms and Concepts
- Lifting envelope
- Mouth
- Burner
- Expand
- Buoyancy
- Archimedes' principle
- Force
Questions
- What are the different parts of a hot-air balloon?
- Based on your research, where did the first manned flight of a hot-air balloon occur?
- Density is defined as mass per unit volume. What happens to the density of the air in the balloon as it is heated? Hint: As the air is heated, the mass of air decreases as some of it is pushed out, while the volume stays the same.
- What is the unit for buoyancy? Hint: it is the same as the unit for measuring how much something weighs.
Bibliography
- How Stuff Works. (2009). How Hot Air Balloons Work. Retrieved May 15, 2009, from http://www.howstuffworks.com/transport/flight/modern/hot-air-balloon.htm
- Nova. (2000). History of Ballooning. Retrieved May 15, 2009, from http://www.pbs.org/wgbh/nova/balloon/science/history.html
- Wikipedia Contributors. (2009, May 7). Hot air balloon. Retrieved May 15, 2009, from http://en.wikipedia.org/w/index.php?title=Hot_air_balloon&oldid=288380677
Materials and Equipment
- Poster board, 3 feet x 2 feet (1 piece)
- Scissors
- Scotch® tape
- Ruler
- Dry-cleaning bags, dress-size (6). The plastic should be as thin as possible. If these are not available from your family or friends, ask at a dry-cleaning business.
- Toaster
- Lab notebook
- Stopwatch or timer
- Sticky notes, 2 inches x 1.5 inches (6)
- Graph paper
Experimental Procedure
Setting up the Experiment
- Fold the poster board in half, lengthwise.
- Cut the poster board in half, along the crease from the fold.
- Tape the two pieces of poster board together, at their short ends. This should make a long rectangle.
- Circle the rectangular piece of poster board around the toaster, so that it leaves about 5 centimeters (cm) of space between the toaster and the paper.
- Tape the edges of the poster board together to make a circle or oval around the toaster. See Figure 2.

Figure 2. Balloon launcher. The toaster has a ring of poster board around it to protect the balloon from direct heat. The balloon (a dry-cleaning bag) is folded near the launcher.
- Trim any extra plastic away from the dry-cleaning bag. For example, some bags have tapered shoulders that leave unused plastic.
- Repair any holes or rips in the bag with clear tape. Use as little tape as possible, since the weight of the tape might affect how the balloon flies.
- Measure the length of the bag. This is the height of the balloon.
- Record the length of the bag in a data table, like the one below, in your lab notebook. You will need one data table for each trial of your experiment.
Trial 1
| Bag Length | Flight 1 | Flight 2 | Flight 3 |
| Full length: ___ centimeters (cm) | |||
| - 15 cm | |||
| - 30 cm | |||
| - 45 cm | |||
| - 60 cm |
- Unplug and clean the toaster if it has a lot of crumbs. It will get hot during the experiments, and the crumbs could start to burn.
- Set up the balloon launcher in an area with a high ceiling and no wind.
- Place the toaster on a clean, dry surface where you plan to launch the balloons.
- Put the poster board ring around the toaster.
Testing the Balloons
- Turn the toaster on. Be ready to time how long the flight lasts with the stopwatch.
- Carefully place a dry-cleaning bag over the toaster. Caution: Be careful not to melt the plastic bag. Be cautious around the cord, so you don't trip.
- Hold the plastic bag up so that the hot air can fill it. See Figure 3.
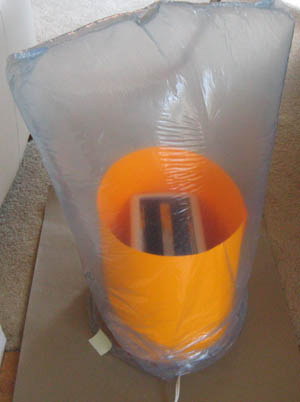
Figure 3. A hot-air balloon about to launch from the toaster pad. Note the sticky note on the bottom edge to help stabilize the flight.
- Continue holding and supporting the balloon until it is fully inflated.
- Release the balloon, start the stopwatch, and watch its flight.
- Record your observations about the flight in your lab notebook.
- If the balloon tips and spills out the hot air, add two sticky notes to the bottom edge, as shown in Figure 2, above. Put the sticky notes on opposite sides of the bottom edge of the balloon.
- If the balloon continues to tip, adjust the sticky notes until the balloon flies straight up.
- You may need to experiment with more sticky notes, or other kinds of weights (such as tape), to get the balloon to fly without spilling its hot air.
- As the balloon is flying straight up, keep track of the time of flight with the stopwatch. Measure the time from when you let it go until it touches the floor. Record your data in your lab notebook.
- Repeat steps 1–7 two more times, recording the time of flight each time in each of your three data tables.
- Be sure you are doing everything the same during each flight so that the times of flight are consistent.
- Now trim 15 cm from the bottom of the dry-cleaning bag. Use your ruler to measure.
- Repeat steps 1–7 three times, always recording the flight times. Record all your procedures and observations in your lab notebook.
- Repeat steps 10–11, trimming off 15 cm for each new flight, so you should have three measurements for each of the following:
- Full-length
- Minus 15 cm
- Minus 30 cm
- Minus 45 cm
- Minus 60 cm
- Now make a graph, either by hand, or using a website like Create a Graph. Put the time of flight on the y-axis and the height of the balloon on the x-axis. You can figure out the height of the balloon by taking the full length of the bag and subtracting the number of centimeters you trimmed off for each flight. How do you think the graph will look?
- Repeat the entire experiment two more times, using new balloons. Repeating the experiments allows you to obtain more data, which increases the reliability of your results.
Very beautiful post thanks for sharing.
ReplyDeleteHot Air Ballooning in Nepal