Introduction
You might already know that conserving water is a good idea, but what exactly are the benefits of water conservation? One benefit is energy conservation. Water-pumping, delivery, and wastewater-treatment facilities consume a significant amount of energy. In some regions of the world (like California) over 15 percent of total electricity consumption is devoted to water management. Saving water conserves this energy for other uses. Another benefit is habitat conservation. Overuse of fresh water can lower the levels of lakes and rivers, causing significant environmental problems. Minimizing human water use helps preserve freshwater habitats for local wildlife and migrating waterfowl, as well as reduces the need to build new dams and other water-diversion infrastructures.
There are few things as wasteful as a water sprinkler system running during a rain storm. The goal of this environmental engineering science project is to build an electronic circuit that can detect when it is raining and that can shut off the power to an automatic sprinkler system.
The circuit will be modified from an example in an electronics kit, making it relatively easy to build. The circuit contains an electronic part called a 4011 integrated circuit (IC). The 4011 IC has four nand gates (the word nand is derived from "not and," reflecting the fact that the "nand" output is the reverse of the "and" output). You will just be using one of them for this science project. A nand gate is able to turn things on or off, depending on the kind of input it receives. The nand gate has two inputs, labeled 1 and 2 in Figure 1, below. The input is "on" when it is at 9 volts (V) and "off" when it is connected to ground.
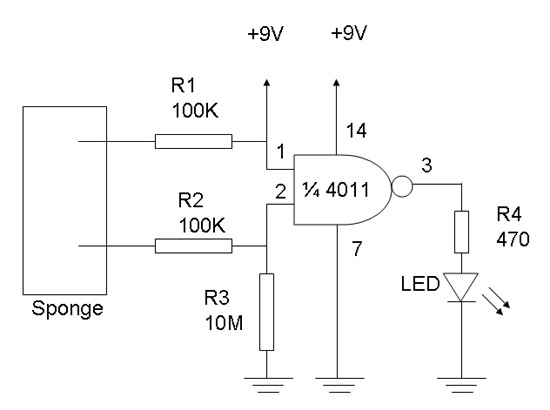
Figure 1. A rain detector circuit. When the sponge is wet, no current flows from input 3 to ground, so the circuit shuts off power. When the sponge is dry, the circuit allows current to flow through the LED to ground (the LED is a substitute for the sprinkler; when it is on or off, the sprinkler would be on or off). The circuit "senses" rain because there is an electrical connection between the wires when the sponge is wet. When this electrical connection is made (when the sponge is wet) the voltages at inputs 1 and 2 become high (9 V, "on") and output goes to 0 ("off"). To turn off a sprinkler system, the power that controls the sprinklers would be connected through the circuit.
Here is how the output is controlled by the two inputs. When inputs 1 and 2 are both at 9 V (that is, 1 and 2 are both "on"), the output from input 3 is "off." For all other combinations of the states of inputs 1 and 2 (off/off, on/off, off/on) the output from input 3 is "on" (9 V). You can put this relationship in a truth table, as shown below.
| 1 | 2 | 3 | LED lights up | Rain |
|---|---|---|---|---|
| On | On | Off | No | Yes |
| On | Off | On | Yes | No |
| Off | On | On | Yes | No |
| Off | Off | On | Yes | No |
This science project involves making the circuit shown in Figure 1 and demonstrating that it shuts off power to the light-emitting diode (LED) when the sponge is wet. The LED represents the sprinkler system. If you choose, you can add the circuit to a real sprinkler system (see the Variations). In an automatic sprinkler system, the water is turned on and off by a solenoid. When the solenoid is powered by a voltage, a part (called a diaphragm) moves so that the water can flow. When the power is turned off, the part falls back to its original location and the water flow is blocked.
The circuit will be modified from a circuit that turns off the power when a touch sensor is touched. For this engineering science project, the touch sensor will be replaced with a "water sensor" in the form of a sponge. If the circuit were used outside, the wet sponge would keep the power off until it was allowed to dry out. It is important to note that the circuit allows electricity to flow only when two conditions are met: the power switch is "on" (as it would be when the sprinkler system is turned on) and the water detector does not sense water. In the circuit, turning the power on just means moving the power switch to the "on" position. For a sprinkler system, the power would most likely be turned on by a timer. When the water sensor is wet in a sprinkler system, the electricity is not allowed to flow, even when the power is turned on.
Terms and Concepts
- 4011 integrated circuit
- Nand gate
- Ground, in circuitry
- Truth table
- Light-emitting diode (LED)
- Solenoid
Questions
- How much water does the average household use per day?
- What are some reasons to conserve water?
- How many nand gates are in the 4011 IC?
- What does the truth table for an "or" gate look like?
- How can you combine nand gates to make an "or" gate?
Materials and Equipment
Note: this project was originally based on the Radio Shack Electronic Sensors Lab kit, which is no longer available. If you have experience working with circuits, you should be able to assemble the circuit based on Figure 1 in the introduction. We have provided links to purchase the individual circuit parts below.
- 4011 integrated circuit
- R1 and R2: Resistors, 100K-ohm (2)
- R3: Resistor, 10M-ohm
- R4: Resistor, 470-ohm
- LED, red
- Wire of various lengths to make circuit connections
- Breadboard
- Battery, 9-V
- 9 V battery holder
- Sponge, rectangular, type you'd use in your kitchen
- Scissors
- Lab notebook
Experimental Procedure
Note: This engineering project is best described by the engineering design process, as opposed to the scientific method. You might want to ask your teacher whether it's acceptable to follow the engineering design process for your project before you begin.
- Assemble your circuit based on the breadboard diagram in Figure 2.
- If you do not know how to use a breadboard, see the How to Use a Breadboard tutorial from SparkFun Electronics.
- If you know how to read a circuit diagram, you can assemble your circuit based on Figure 1 in the introduction instead. See the How to Read a Schematic tutorial from SparkFun Electronics to learn about reading circuit diagrams.
- Connect the red and black wires from the battery holder to the breadboard's positive (+) and ground (-) buses respectively.
- Insert the 4011 chip into rows 1–7, so it straddles the gap in the middle of the breadboard.
- Note: the chip's pins are numbered from 1–14, starting in the upper left and going counterclockwise.
- Use a jumper wire to connect pins 1 and 14 to the breadboard's positive bus (although red is traditionally used to represent positive in electronics, you do not have to use a red wire if your kit does not have a red wire of the right size).
- Use a jumper wire to connect pin 7 to the ground bus (although black is traditionally used to represent ground in electronics, you do not have to use a black wire if your kit does not have a black wire of the right size).
- Use the 10 MΩ resistor (brown, black, blue, and gold stripes) to connect pin 2 to the ground bus.
- Use the 470 Ω resistor to connect pin 3 to row 10 on the breadboard.
- Use the LED to connect row 10 on the breadboard to the ground bus. The LED's long leg should go in row 10, and the short leg should go in the ground bus.
- Connect one lead of a 100 kΩ resistor to pin 1, and leave the other end free.
- Connect one lead of a 100 kΩ resistor to pin 2, and leave the other end free.
- Your completed circuit should look like the one in Figure 3.

Figure 2. A breadboard diagram for the rain detector circuit.

Figure 3. A completed rain detector circuit.
- When you have completed assembling the circuit, the LED should light up. If it does not light up, check your wiring carefully.
- Cut the sponge into two parts (square shapes).
- Soak one piece of sponge in tap water. Keep the other piece dry.
- Touch the wet sponge to the two free leads from resistors R1 and R2. What happens?
- Touch the dry sponge to the two free leads from resistors R1 and R2. What happens?
- For your science fair display board, note that turning on the power to your circuit is equivalent to the sprinkler system's timer starting the sprinkler. The LED shows whether or not electricity is flowing. When the LED is on, the sprinkler would be on.
No comments:
Post a Comment