Introduction
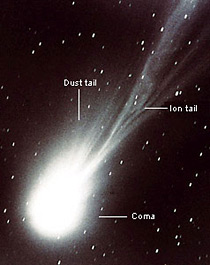 Here is an image of Halley's Comet showing the coma and tail structure (Yeomans, 2005).
In 2006, scientists at NASA got a very special delivery all the way from outer space. It was a package of space particles captured by the StarDust Mission, a satellite that had been sent into space 7 years earlier. StarDust's mission was to fly through the coma of the comet Wild 2 to capture some stardust, and then to send the capsule back home to earth where it could be studied by a team of scientists. The coma of a comet is near the nucleus and has a high density of dust, gas, and particles.
When the capsule landed in the desert of Utah in 2006, scientists were relieved to see the tiny space particles unharmed and ready to be studied. By studying the captured particles from the StarDust Mission, scientists will have seen some of the oldest particles in the universe (NASA JPL, 2007).
How did the satellite capture the particles? This satellite was designed with a special collection panel containing a special gel called "aerogel" that could trap the particles as they bombarded the panel (Figure 1a). The trace of each single particle could be seen in the aerogel where it hit the collection panel (Figure 1b). Then, each single particle could be cut out of the gel as a triangular slice and examined to find out what type of matter the particle was made of (Figure 1b).

Figure 1a.

Figure 1b.
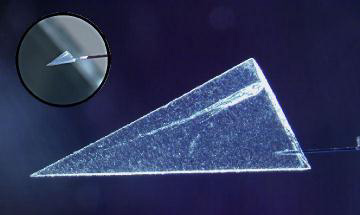
Figure 1c.
Scientists at the NASA Jet Propulsion Laboratory devised a way to trap particles from the comet using a specially designed panel containing aerogel (1a). The aerogel material captures particles inside the gel (1b) so they can be later cut out of the gel and studied (1c) (Images from NASA JPL, 2007).
In this experiment, you will build your own mini satellite and use it to collect some pretend stellar debris. You will make your satellites out of a milk carton and use petroleum jelly to capture particles. Then you will use different lengths of string to hang your satellites at different distance from the ground, simulating different orbital distances. If you simulate an asteroid impact, how much stellar dust will your satellites collect? Will placing your satellite at different "orbital" distances from the impact change the amount of debris collected?
Terms and Concepts
To do this type of experiment you should know what the following terms mean. Have an adult help you search the Internet, or take you to your local library to find out more!
- Satellite
- Stardust
- Particles
- Orbit
- Distance
Questions
- How can a satellite be designed to collect particles from space?
- How can a satellite be used to study astronomical phenomenon, like a meteor impact or a passing comet?
- Does the distance of a satellite to an astronomical object affect the number of particles collected?
Bibliography
- Read all about NASA's Stardust Mission to collect particles from the tail of a passing comet:
NASA JPL, 2007. "Stardust - NASA's Comet Sample Return Mission," National Aeronautics and Space Administration (NASA), Jet Propulsion Laboratory, California Institute of Technology. [accessed September 6, 2007
Materials and Equipment
- 1/2 gallon milk carton
- Scissors
- String
- Vaseline (or other petroleum jelly product)
- Volunteer
- Face mask (like the kind used when painting a room)
- Penny
- Permanent marker
- Clothes hanger
- Meter stick
- Ashes (from a fireplace or grill)
- Large pan (or flat box)
- Baseball
Experimental Procedure
- First, you will need to build your satellites, one for each distance you will test. In this procedure I describe using three satellites, but you can build more. This procedure describes a simple design for a mini satellite you can build using a milk carton
- Cut one side of the milk carton box off using scissors. Cut the piece of milk carton into three rectangles of the same size:

- Cut a slit in each rectangle, halfway down the center of the rectangle. Draw a circle on each "wing" on the white side of the rectangle using the permanent marker and a penny as your guide. You should end up with 2 equal-sized circles on each rectangle:

- Assemble the two pieces into a mini-satellite. Tie a string around the center of the satellite for hanging.

- Repeat steps 2-4 to make three (or more) total satellites.
- Prepare your satellite mounting device (a clothes hanger) for your volunteer to hold for you. Hang each of your satellites from a clothes hanger at different lengths using the attached strings. One satellite should be on a short string (about 10 cm), the next on a medium sized string (about 50 centimeters), and the last on a long string (about 100 cm or 1 meter). If you are using more than three satellites, just change your measurements accordingly.
- Next, you will need to set up your crater impact simulation. This experiment is very dusty and messy, so you will need to set up your simulation outdoors. Also, you will need to bring your volunteer to help you hold your satellites during the "meteor" impact. Your back yard would be a good place to set up your simulation site.
- Place a tray or shallow box on the ground at your test site.
- Fill the shallow tray or box with ash from your fireplace or grill. If you do not have any, you can substitute any light, dusty powder in place of the ash like: chalk, talcum powder, etc. Allow all of the ash to settle and do not disturb the ash until you are ready for your experiment.
- Smear a layer of petroleum jelly (Vaseline) on each circle of your satellite. The jelly will collect particles by sticking to them. You should have four jelly-smeared collection circles on each satellite. NOTE: It is very important to protect your satellites after this step, so that you do not accidentally contaminate the jelly-smeared circles with debris. Try and keep them clean until you do the simulation!
- Have your volunteer put on a face mask and hold the satellite hanger above, but not touching, the surface of the ash. Explain to your volunteer what you will do in the next step (so they won't freak out) and tell them to hold very still.

- After a countdown, throw a "meteor" (a hard object such as a baseball) into the pile of ash, causing a "crater impact" and sending up a cloud of "stardust" around the impact crater.
- After the dust settles you can tell your volunteer to give you the satellite hanger, and be sure to thank them for doing such a great job.
- Using a digital camera, photograph each collection circle (4 total) for each satellite using the digital micro setting on your camera. Here is an example of the three photos I took for my experiment:

(10cm string)
(50cm string)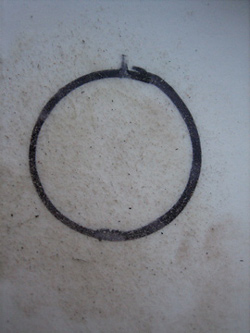
(100cm string)Examples of my collection circles at varying distances from a minisatellite: farthest from the impact on the shortest string (10cm), at a medium distance from the impact on a medium length string (50cm), and nearest the impact on a long string (100cm). - Once you take your pictures, you can repeat the experiment and collect more data by wiping off the petroleum jelly COMPLETELY and starting again at step 10.
- Now you can analyze the data. Open each photo in a digital photo editor, like iPhoto or Adobe Photoshop. Count the total number of particles in each circle, and write the data in a table:
Satellite Orbit Distance (cm) Number of Particles Counted in Each Circle Average Number of Particles Collected Circle #1 Circle #2 Circle #3 Circle #4 10 cm 50 cm 100 cm - Calculate the average number of particles for each satellite orbit distance by adding together all of your data (in this case, circles 1-4) and dividing by the number of data points (4). Write your answer in the final column of the data table.
- Make a bar graph of your data. Make a scale for the "Average Number of Particles Collected" on the left side of the graph (y-axis). Draw one bar for each satellite orbit distance you tested, and label each bar on the bottom (x-axis) of the graph.
- What do your results mean? Does the average number of particles collected increase or decrease with orbit distance? What conclusion can you make about this?
No comments:
Post a Comment