Introduction
The music that we listen to, the movies we watch, and the video games we play are often stored on CDs. A CD is a way of storing data, or information, by using a laser to etch the data into a long groove, called a track. The data in the track is etched as a long series of tiny bumps that are scanned by a laser in your CD or DVD player. Each CD has one long spiral track of data that circles from the inside of the disc to the outer edges. Each tiny data track is only about 0.5 microns wide, with a spacing of 1.6 microns between each track. A micron is a millionth of a meter, so each individual track is much too small to be seen by the naked eye!
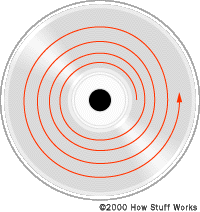
A CD has a long, spiraled data track. If you were to unwind this track, it would extend out 3.5 miles (5 km). (Harris, 2006)
If you have a CD burner, you can store data by using special CDs called CD-Recordable discs, or CD-R's. These special discs don't have any bumps in the data track. Instead they use a series of light and dark spots which are "burned" into the track when the laser of the CD burner shines on the track and reacts with a special light-sensitive dye inside the disc. When the disc is empty the dye is clear, but when you heat the dye with concentrated light from the laser, the dye darkens. By blinking the laser on and off along the track, the CD burner etches a series of light and dark spots which create a digital pattern that a standard CD player can read.
In this experiment you will take advantage of the change in the light-sensitive dye inside the CD-R to measure how much data has been burned. After marking the border between used and unused parts of the disc, you will use a ruler to measure how much space the data uses. What will happen to the amount of free disc space as more data is burned to a disc?
Terms and Concepts
To do this type of experiment you should know what the following terms mean. Have an adult help you search the Internet, or take you to your local library to find out more!
- Compact Disc - Recordable (CD-R)
- CD burner
- data
- file size (MB)
Questions
- How much information can be stored on a CD?
- Can you see the information stored on a CD?
- How can the amount of information on a CD be measured?
Materials and Equipment
- computer
- CD burner (internal or external)
- 8 blank CD-R discs
- a photo, music file, or folder about 100 MB in size
- permanent marker
- metric ruler
Experimental Procedure
- In this experiment you will need to use a CD burner to write data onto a CD-R disc. First, check with a parent to make sure you have access to a CD burner. It can either be internal (inside your computer) or external (something you will need to connect with a cable). Have your parents show you how to properly use the device.
- CD-burners use software to help you burn data onto the disc. Familiarize yourself with the software that your parents use to burn CDs. Make sure you know how to:
- load files onto the blank CD,
- find the allocated (used) disc space,
- find the available (unused) disc space,
- initiate and complete the burn.
- You will need some data to burn onto your CD. Good sources of data are photos and music. Try to find a file that is about 100MB. It is a good idea to save a separate copy of this file, because you will be writing on your CD later (and probably spoiling it for reading on your computer). So be sure that the file you choose is either unimportant or is saved somewhere on the computer else.
- Once you find the file you want to use, put it in a new folder on your desktop entitled, "CD Burn Experiment" so that you can find it easily.
- Next, you need to make a data table to record your results:
Trial Used Disc Space (MB) Unused Disc Space (MB) Distance From the Center (cm) #1 #2 #3 - Place your first CD-R into the burner, place one copy of your file on the disc and burn. Write down the amount of used and unused disc space in your data table.
- After the burn is complete, write "Trial #1" on the front of the CD with a permanent marker.
- Turn the CD-R over to the shiny side. While tilting the CD-R from side to side, try and locate a fine line that encircles the disc. The inner side of the line will appear slightly dull compared to the outer side of the line. This line is at the edge of the laser etched portion of the data you have written on the disc, which appears dull.
 In this photo, an arrow marks the border between the used and free disc space of a CD-R after being burned.
 - When you see it, place a dot on the line with a permanent marker. Measure the distance from the center of the CD-R to the dot you have marked. Write the data in your data table.
- Repeat steps 6–9 with the next CD-R, but this time put two copies of your file on the disc (which should be about 200 MB). When complete, label the disc "Trial #2" and find the line, mark and measure as before.
- Continue to add one more file each time, until you have a total of 6 or seven trials. This will depend upon the size of the file you use (< or > 100 MB) and the size of your CD-R (74 or 80 min).
- What happens to the location of the line as more data is stored onto the disc?
- Make a graph of your results. Does the distance from the center of the disc increase or decrease as more data is added? Is the amount of increase in distance the same each time? Why or why not?
No comments:
Post a Comment